The process of gum bichromate is a means in which to process
images. It is a short tonal scale process. Gum Bichromate allows photographers to
have freedom in the way their prints turn out. Gum bichromate requires many
materials and equipment which can be confusing, but overall is said to be quite
simple. The gum bichromate process began in the 19th century. It was
originally invented by Mungo Ponton in 1839 and later revised to its final form
by William Henry Fox Talbot and Alphonse Poitevin. The process all together has
twelve steps. Which goes along like this:
1. Negative Preparation - The negative needs to be enlarged in
order to properly create a gum bichromate print.
2. Sizing Paper – The paper
has to be the correct size before processing begins due to a water submersion
processing which shrinks the paper about fifteen percent.
3. Preparing Sensitizer – The sensitizer is made up of a
formula of Ammonium Dichromate, Water at 52 degrees Celsius and cool water.
4. Preparing Gum Arabic Solution – The solution remedy used
includes, Mercuric chloride, Cool distilled water and powdered gum Arabic in
liquid form.
5. Preparing Stock Pigment and Gum Solution – Add gum solution
to total amount of stock pigment.
6. Preparing Paper for Printing – Place the enlarged negative
produced in step one and lay it in the exact position sought after for the
final print. Then, secure the negative with tape and create pinholes in the top
two corners.
7. Preparing the Emulsion – The formula is made up of the
prepared Ammonium Dichromate and the prepared pigment and gum.
8. Coating the Emulsion on Paper – During the emulsion process,
you should be in a darkroom. First, secure the paper and then use brushes to
coat the paper in emulsion.
9. Exposure – Place the negative and paper in contact frame and
position it for exposure. The exposure could take anywhere from two to fifteen
minutes.
10. Development – Following the exposure immediately immerse the
exposed print in water face up for one minute and then transfer to another tray
emulsion side down in a u-shape. Transfer the print back to tray one with clean
water and continue this process for fifteen minutes to one hour.
11. Multiple Printing – After developing the print it is
possible to repeat the steps of the process in order to create the complete
range of tones possible.
12. Print Stabilization – Allow print to dry and then submerge
in a five percent solution for five minutes. Then, give the print a running water
rinse and hang to dry.
The gum
bichromate process is still employed today by many photographers. One famous
photographer who uses the gum bichromate process for all of their images is
Massimo Attardi. Attardi is from Italy and resides in Rome. His gum bichromate prints
have been processed on wood, paper, metal, glass, stone and plexiglass. Today,
many of his exhibitions have been displayed in the Laboratory Museum of
Contemporary Arts in Rome.
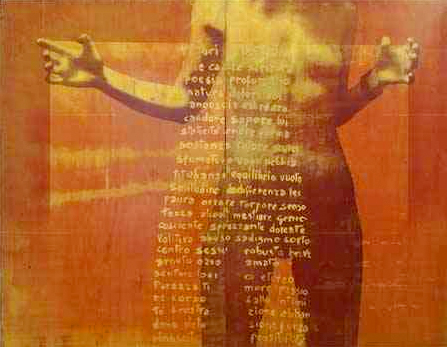
This is an image created by Massimo Attardi. Gum bichromate on wood. Original link listed below.
No comments:
Post a Comment